Imported Claims Page
On the navigation bar, click Claims and select Imported Claims. Use this page to see the status of an imported file. This page displays successful, unsuccessful, and duplicate imports.
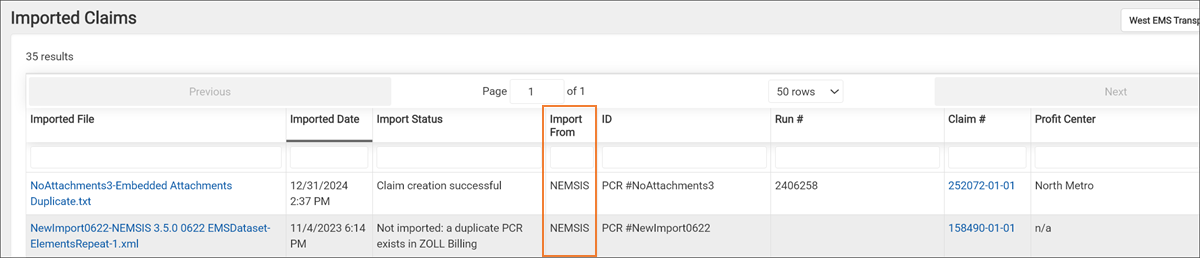
Imported File: Click this link to view the XML file.

Imported Date: This is the date the file was imported.
Imported Status: Displays the status of the import. Possible statuses include:
-
Successful: Import status reads, "Claim creation successful" and the claim number displays in the "Claim #" column.
-
Unsuccessful: Import status contains an error with an information icon. No claim number was generated.
-
Duplicate: Import status reads "Account verification needed" and TBD displays in the "Claim #" column.
Imported From: Shows if this was a NEMSIS, Dispatch (.xml), or other type of file. If the file type could not be identified, an n/a will display.
-
NEMSIS
-
Dispatch

ID: If the file contained an ID, such as a PCR number, it will appear in this column.
Run #: If the file contained a run number, it will appear in this column.
Claim #:
-
TBD: When you import a NEMSIS or Dispatch file, ZOLL Billing searches for existing patient records containing the same name, date of birth, and/or address. If one or more records exist, a TBD displays in this column. Click TBD to verify the patient information. Check the list of existing patient records. If you see a match select it, if not select "Nope" to create a new patient record. After the selection, click Next to create the claim and go to the "Incident details" tab of the incomplete claim.
If the imported claim was a duplicate, follow the instructions in the Duplicate patient records section.
-
Claim number: If there was a match on the name, date of birth, and/or address, a claim was created and this field displays the claim number. Click this link to view the claim.
-
Blank: If there was an import error, then this field will be blank.
Resolved: If the Imported Status column displays an error such as "Claim creation failed" or "Not imported: file failed validation", a check box displays in the Resolved column. After the issue is resolved, check the box to show others that they do not need to address this issue.